Unit Parts
A section of pixels can be grouped together as a part. Parts have a single health pool and can only be destroyed as a whole.
Config
1 2 3 4 5 6 7 8 9 10 11 12 13 14 15 16 17 18 19 20 21 22 23 24 25 26 27 28 | { "forms":[ { "parts":{ "core": { "corePath": "misc/core/octopus/core0", "size": 12, "placements": [ 0 ], "hp": 900, "requires": [ "gun", ], }, "gun": { "corePath": "misc/core/octopus/smallGun", "size": 7, "placements": [ 73, 89 ], "hp": 500, }, "stud": { "spritePath": "stud/stud_2x14", "width": 2, "height": 14, "placements": [ 1628, 1332, 1360, 1064 ], "hp": 400, }, } }, ], } |
corePath is used when drawing a layered sprite that can move.
spritePath is used when representing a part as a single-layered image.
In official stages, sprites are generally used for non-square parts, and layered cores are used for square parts.
Warning
It's a bit confusing that each boss typically has a part named "core" in the center, while the word "core" is also used to refer to the layered moving sprites that represent most parts. Just be aware that the term is overused.
Placing
The part config needs to know which pixels are in it, from your editor source file.
1) Load your animation file in the PxcEditor.
2) Decide which part you want the details of - in this case, the core:

3) Hold V and right click inside the part, to select all adjacent pixels of the same color.

4) Press Middle Mouse Button or the
=button on the far right of the toolbar to toggle showing pixel assignments.

5) The first number in the range (
0) is yourplacement, or the starting pixel of your part. Thesizeis used for square parts.
1 2 3 4 5 6 7 8 | "parts": { "core": { "corePath": "misc/core/octopus/core0", "size": 8, "placements": [ 0 ], "hp": 900, }, }, |
To use the same config for multiple parts in your unit, simply list more placements:
1 | "placements": [ 73, 89 ], |
For square parts of different sizes that are otherwise identical, use this form:
1 2 3 4 5 6 | "placements": [ { "size": 8, "start": 25 }, { "size": 6, "start": 89 }, { "size": 6, "start": 125 }, { "size": 5, "start": 161 }, ], |
For non-square parts, use width and height instead of size.
1 2 3 4 5 6 7 | "stud": { "spritePath": "stud/stud_2x19", "width": 2, "height": 10, "placements": [ 4 ], "hp": 300, }, |
Protecting Parts
Parts can remain invulnerable until certain other parts are destroyed. Usually the core can't be destroyed until the other parts are gone.
In the following example, the core part will be protected & invulnerable until the two smallGun parts and the two largeGun parts are destroyed.
1 2 3 4 5 6 7 8 9 10 11 12 13 14 15 16 17 18 19 20 21 22 23 24 25 26 27 | { "forms":[ { "parts":{ "core": { "corePath": "misc/core/invasion/core0", "size": 18, "placements": [ 900 ], "hp": 2000, "requires": [ "smallGun", "largeGun", ], }, "smallGun": { "corePath": "misc/core/invasion/smallGun", "size": 11, "placements": [ 1616, 1737 ], "hp": 1000, }, "largeGun": { "corePath": "misc/core/invasion/largeGun", "size": 14, "placements": [ 1224, 1420 ], "hp": 1200, }, } }, ], } |
Ropes
Parts have a visual "rope" connecting them to any parts they're protecting.
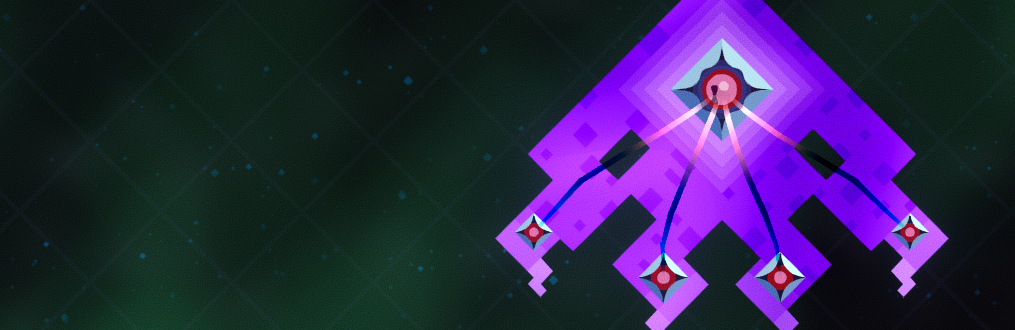
The visuals can be adjusted with optional parameters:
1 2 3 4 5 6 7 8 9 10 11 12 13 14 15 16 17 18 19 20 21 | { "parts":[ "core": { "corePath": "misc/core/octopus/core0", "size": 8, "placements": [ 0 ], "hp": 900, "requires": [ "mid", "side" ], "ropeColorStart":"color(1f,0f,0f)", "ropeColorEnd":"color(1f,0f,0.66f) * 1.25", "ropeWobbleOpacityMin":0, "ropeWobbleOpacityMax":1, "ropeWobbleGlow":3, "ropeWobbleWidthMin":0, "ropeWobbleWidthMax":1, "ropeTightness":3, "ropeWidthLerpFunc":"mapReturn(ropeSpringNum, 0f, ropeNumSprings, 20f, 1f, 'QuadOut')", "ropeOpacityLerpFunc":"mapReturn(ropeCurrLength, 0f, ropeTotalLength, 0f, 1f, 'QuadIn')", }, ], } |
All rope parameters
| Property | Type | Summary | Default Value |
|---|---|---|---|
ropeColorStart |
Color | color at protecting part | color(0.66f, 0.66f, 1f) |
ropeColorEnd |
Color | color at protected part | color(0f, 0f, 1f) |
ropeOpacityNormal |
float | opacity when rope is slack | 0.5 |
ropeOpacityStretched |
float | opacity when rope is stretched | 0.25 |
ropeWidthFactorNormal |
float | width factor when slack | 0.66 |
ropeWidthFactorStretched |
float | width factor when stretched | 0.4 |
ropeWobbleWidthMin |
float | width factor when spring is not wobbling | 0.25 |
ropeWobbleWidthMax |
float | width factor when spring is wobbling | 2.5 |
ropeWobbleGlow |
float | glow factor when spring is wobbling | 1 |
ropeWobbleEasingType |
EasingType | how the wobble effect eases through rope | QuadIn |
ropeWobbleDelayPerNode |
float | makes the wobble effect look interesting | 0.075 |
ropeWobbleOpacityMin |
float | opacity factor when spring is not wobbling | 0.1 |
ropeWobbleOpacityMax |
float | opacity factor when spring is wobbling | 1 |
ropeLength |
float | slack length of rope | 8 |
ropeLengthEasingType |
EasingType | how length distributed through springs | SineInOut |
ropeNumNodes |
int | how many nodes (and therefore springs) in rope | 5 |
ropeTightness |
float | how much force springs apply to stay slack | 15 |
ropeNodeTopSpeed |
float | controls how much friction the node has | 30 |
ropeNodeFrictionMin |
float | friction at no speed | 0.01 |
ropeNodeFrictionMax |
float | friction at top speed | 0.05 |
ropeNodeMass |
float | how heavy the nodes are | 0.25 |
ropeBlockWidthFactor |
float | width factor when protected part is being attacked | 1.33 |
ropeBlockOpacityFactor |
float | opacity factor when protected part is being attacked | 2 |
ropeBlockGlowFactor |
float | glow factor when protected part is being attacked | 4 |
ropeBlockColor |
Color | rope color when protected part is being attacked | color(1f, 1f, 1f) |
ropeAnimSpeedNormal |
float | normal wobble speed | 0.25 |
ropeAnimSpeedBlock |
float | wobble speed when protected part is being attacked | 3 |
Info
The wobble properties refer to the pulsing effect that moves along the rope toward the protected part. For example, ropeWobbleWidthMax is the multiplier applied to the spring width when the full wobble effect has reached that spring.
The following func properties can be used to adjust things along the length of a rope:
| Property | Type | Summary |
|---|---|---|
ropeWidthLerpFunc |
float | width of the rope at a given point |
ropeOpacityLerpFunc |
float | opacity of the rope at a given point |
ropeTightnessLerpFunc |
float | tightness of the rope at a given point |
ropeGlowAddLerpFunc |
float | amount to add to rope's glow at a given point |
These variables are made available for using in the funcs:
| Property | Type | Summary |
|---|---|---|
ropeSpringNum |
int | the current spring we're considering |
ropeNumSprings |
int | total number of springs in the rope |
ropeCurrLength |
float | the amount of length we've traversed, at the current spring |
ropeTotalLength |
float | the total length of the rope |
Lasers
Lasers are raycasted lines that stop when they hit a pixel, and damage the player if they pass through while the laser is active.
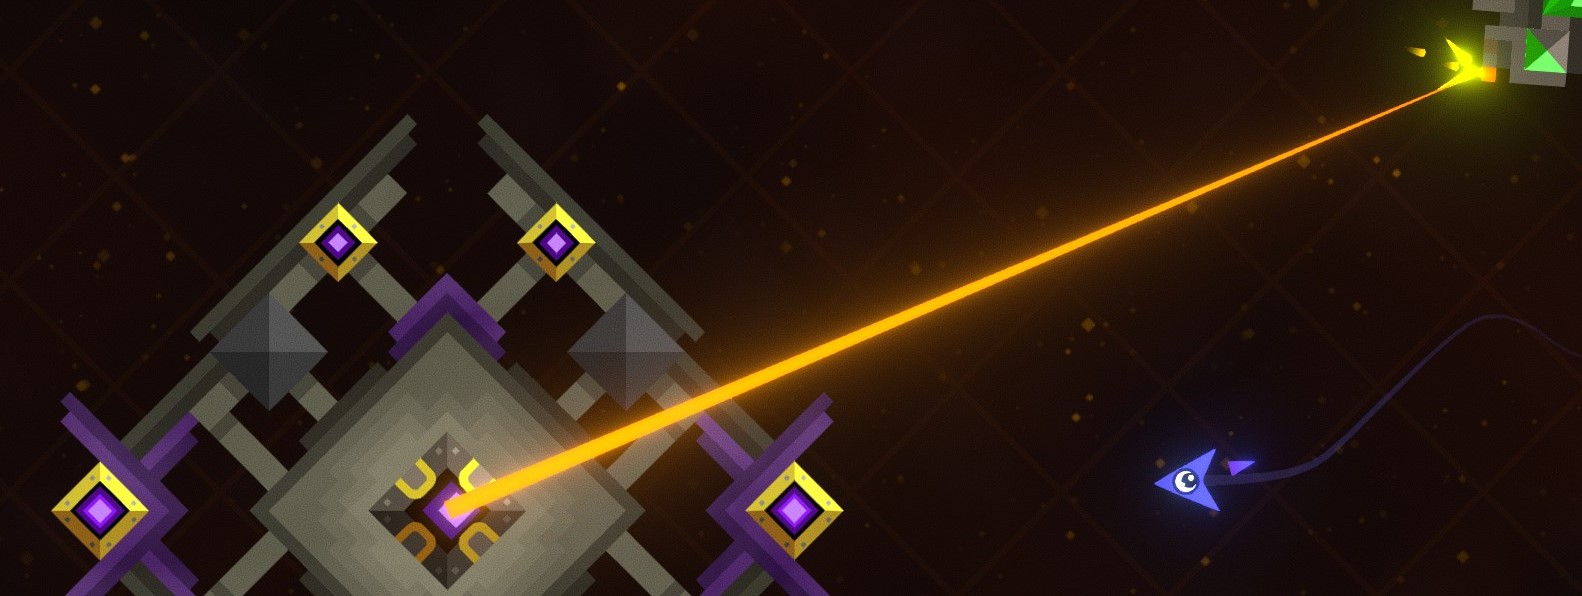
You can usually achieve a similar obstacle with a bullet, but if you want pixel collision or you plan to rotate the obstacle extremely fast, a laser can be more appropriate (no matter how fast the laser or the player is moving, passing over an active laser will damage the player)
1 2 3 4 5 6 7 8 9 | "parts":{ "core": { "corePath": "misc/core/laser/core1", "size": 8, "placements": [ 0 ], "hp": 780, "laser":{ "dps":10, "autoRotate":true, "rotationSpeed":-4.5, "startAngle":0, "ignoreCollisionWith":["egg", "trap"], "colorOnA":"color(1f, 0.15f, 0f) * 1.33f", "colorOnB":"color(1f, 0.1f, 0f) * 0.35f", "colorBlinkTimeOn":0.25, "colorBlinkEasingType":"Linear", "widthAMin": 1.5, "widthAMax":1.75, }, }, }, |
Expanded for clarity:
1 2 3 4 5 6 7 8 9 10 11 12 13 | "laser":{ "dps":10, // damage per second dealt to pixels "autoRotate":true, // simply rotate this laser instead of aiming at a target "rotationSpeed":-4.5, "startAngle":0, "ignoreCollisionWith":["egg", "trap"], "colorOnA":"color(1f, 0.15f, 0f) * 1.33f", "colorOnB":"color(1f, 0.1f, 0f) * 0.35f", "colorBlinkTimeOn":0.25, "colorBlinkEasingType":"Linear", "widthAMin":1.5, "widthAMax":1.75, }, |
All laser properties
| Property | Type | Summary |
|---|---|---|
dps |
float | damage per second to pixels |
startAngle |
float | start angle |
autoRotate |
bool | if true, use rotationSpeed and turn, if false, use aimSpeed towards target |
rotationSpeed |
float | opacity when rope is stretched |
aimSpeed |
float | width factor when slack |
colorOffA |
Color | first color when off |
colorOffB |
Color | second color when off |
colorOnA |
Color | first color when on (on = dangerous) |
colorOnB |
Color | second color when on |
colorBlinkTimeOn |
float | blink time between colors when on |
colorBlinkTimeOff |
float | blink time between colors when off |
colorBlinkEasingType |
EasingType | easing type for blinking |
animSpeedOff |
float | speed of wobble when off |
animSpeedOn |
float | speed of wobble when on |
widthAMin |
float | min width of start |
widthAMax |
float | max width of start |
widthBMin |
float | min width of end |
widthBMax |
float | max width of end |
hitSelfPixels |
bool | whether the laser can impact pixels of its own unit |
impactPattern |
Pattern path | spark pattern at impact |
impactPatternDelay |
float | how often to spawn impact pattern |
missOffPattern |
Pattern path | pattern when off and not hitting pixel |
missOnPattern |
Pattern path | pattern when on and not hitting pixel |
length |
float | how far laser reaches |
lengthLerpSpeed |
float | how fast the laser reaches full length (0-1) |
sfxHit |
string | impact sound |
ignoreCollisionWith |
string | name of units that should not collide with laser |
damagePlayer |
bool | if false, don't collide with player |
onHitPlayer |
List of Actions | handler for hitting player |
partDamageFactor |
float | multiplier for how much damage is dealt to parts |
Laser Methods
Laser can be modified at any point by calling methods on the Unit that contains them.
These are the most useful methods:
SetLaserActive
Sets leftGun's laser to active, meaning it will now be visible and collide with pixels:
1 2 3 4 5 | { "action": "CallMethod", "method": "SetLaserActive", "params": { "part": "leftGun", "active":true, // set `active` to false to turn off the laser } }, |
You can also use ToggleLaserActive to turn it on if it's currently off, and vice-versa:
1 | { "action": "CallMethod", "method": "ToggleLaserActive", "params": { "part": "leftGun", }}, |
SetLaserDangerous
Sets leftGun's laser to dangerous, meaning it will now collide with the player and damage pixels:
1 2 3 4 5 | { "action": "CallMethod", "method": "SetLaserDangerous", "params": { "part": "leftGun", "dangerous":true, // set `dangerous` to false to keep the laser visible but unharmful } }, |
You can also use ToggleLaserDangerous to turn it dangerous if it's currently harmless, and vice-versa:
1 | { "action": "CallMethod", "method": "ToggleLaserDangerous", "params": { "part": "leftGun", }}, |
SetLaserDps
Sets the damage that core's laser deals to pixels or parts:
1 2 3 4 5 | { "action": "CallMethod", "method": "SetLaserDps", "params": { "part": "core", "dps":"map(stageTime, 0f, 60f, 75f, 300f, 'QuadIn')", // sets the lasers damage to increase over time } }, |
SetLaserAutoRotate
Sets whether gun's laser rotates automatically (when true) or rotates toward a target point (when false):
1 2 3 4 5 | { "action": "CallMethod", "method": "SetLaserAutoRotate", "params": { "part": "gun", "autoRotate":false, } }, |
Note
If the unit contains multiple parts named gun, this will affect all of their lasers.
SetLaserAutoRotateSpeed
Sets the speed at which gun's laser rotates automatically:
1 2 3 4 5 | { "action": "CallMethod", "method": "SetLaserAutoRotateSpeed", "params": { "part": "gun", "autoRotateSpeed":-10, } }, |
SetLaserTargetAngle
Sets the angle that leftGun's laser aims towards (ignored if the laser has autoRotate set to true):
1 2 3 4 5 | { "action": "CallMethod", "method": "SetLaserTargetAngle", "params": { "part": "leftGun", "angle":"vecToAngle(playerPos - unit.GetPartPos('leftGun'))", // aims from the part toward the player } }, |
SetLaserAimSpeed
Sets the speed at which leftGun's laser eases toward its target angle:
1 2 3 4 5 | { "action": "CallMethod", "method": "SetLaserAimSpeed", "params": { "part": "leftGun", "aimSpeed":0.01, // use a value between 0-1 (1 will instantly approach the target angle) } }, |
Handlers
You may want to call Actions from a unit part.
1 2 3 4 5 6 7 8 9 10 11 12 13 14 | "parts":{ "core": { // ... "onSpawn":[ // called when part spawns or respawns { "action": "CallMethod", "target":"stage", "method": "ShakeCamera", "params": { "strength": 3, "time": 0.5, "easingType": "QuadOut" }}, ], "onUpdate":[ /* called each frame while part is active */ ], "onDestroy":[ /* called when part is destroyed */ ], "onHit":[ /* called when part hit by bullet or laser */ ], "onHitProtected":[ /* called when part hit by bullet or laser and has other part shielding it */ ], }, }, |
Core Controllers
Core Controllers are used to draw multi-layered sprites on unit parts.
Full config: misc/core/octopus/core0.json
1 2 3 4 5 6 7 8 9 10 11 12 13 14 15 16 17 18 19 20 21 22 23 24 25 26 27 28 29 30 31 32 33 34 35 36 37 38 39 40 41 42 43 44 45 46 47 48 49 50 51 52 53 54 55 56 57 58 59 60 61 62 63 64 65 66 67 68 69 70 71 72 73 74 75 76 77 78 79 | { "background1": { "color": "#1b1335", "chargePercent":0.2, "shootPercent":0.2, }, "background2": { "image": "cores/shapes/circle", "color": "#2a2863", "scale": 0.8, "chargePercent":0.3, "shootPercent":0.3, "chargeScale":1.1, "shootScale":1.2, "reactScale":0.9, }, "background4": { "image": "cores/shapes/circle", "color": "#36317f", "scale": 0.65, "chargePercent":0.4, "shootPercent":0.4, "chargeScale":1.1, "shootScale":1.2, "reactScale":0.9, }, "eye2": { "image": "cores/shapes/circle", "color": "#de75ac", "scale": 0.5, "chargePercent":0.5, "shootPercent":0.5, "chargeScale":1.1, "shootScale":1.2, "reactScale":0.9, "shootWobbleScale":1.15, "shootWobbleSpeed":15, }, "pupil": { "image": "cores/octopus/eye1", "scale": 0.25, "lookRadius": 0.125, "chargeScale":1.25, "shootScale":1.66, "reactScale":0.9, "shootWobbleScale":1.15, "shootWobbleSpeed":15, }, "highlight": { "image": "cores/shapes/highlight01", "scale": 0.37, "lookRadius": 0.05, "chargePercent":0.6, "shootPercent":0.6, "chargeScale":1.1, "shootScale":1.2, "reactScale":0.9, "shootWobbleScale":1.15, "shootWobbleSpeed":15, }, "background3": { "image": "cores/shapes/circleline01", "color": "#970816", "scale": 0.55, "chargePercent":0.4, "shootPercent":0.4, "chargeScale":1.1, "shootScale":1.2, "reactScale":0.9, "shootWobbleScale":1.15, "shootWobbleSpeed":15, }, "frame": { "image": "cores/octopus/frame1", "tintPercent": 0.25, "chargePercent":0.1, "shootPercent":0.1, }, } |
Sprites
You can also represent a unit part with a single-layered sprite instead of a core controller. The sprite can be static or animated.
Here's an example from the Execution stage:
1 2 3 4 5 6 7 8 | { "parts": { "trigger": { "spritePath": "execution_trigger", // ... }, }, } |
execution_trigger.json:
1 2 3 4 5 6 7 8 9 10 11 12 13 | { "anims": { "idle":{ "frameNums": [ 0, 1, 2, 3, ], "totalTime": 0.5, "loopMode": "PingPong", "easingType": "Linear", }, }, "gridHeight":2, "gridWidth":2, "spritesheetPath":"fuse/trigger_anim2", } |
fuse/trigger_anim2:

Script Parameters
These parameters can be used inside any scriptfunc by a PixelGroup.
Info
FAQ
How do I check if a part has been destroyed?
You may want to change behaviour depending on if a certain part has been destroyed or not.
Unit.DoesPartExist will return true if one or more parts of the specified type still exist.
1 2 3 4 5 6 7 8 | { "action": "Condition", "condition": "unit.DoesPartExist('topGun')", "true": [ // ... ], "false": [ // ... ], }, |
Use Unit.GetPart to access a specific part, then use the PixelGroup.IsActive property to see if it still exists:
1 2 3 4 5 | // Find the third `topGun` part (based on order they were defined) and see if it still exists { "action": "Condition", "condition": "unit.GetPart('topGun', 2).IsActive", "true": [ // ... ], "false": [ // ... ], }, |