Bullets
Bullets are used for many things in Chippy, besides simple obstacles. They can be visual effects, anchors for floating text, or enablers for invisible AOE effects.
Data
Bullet definitions can be stored in their own json file, but it's usually easier to include them in the same file as the pattern that uses them.
Defined in its own file
This is the entire content of an example bullet file, lets say MyCampaign/bullet/myBullet.json.
1 2 3 4 5 6 7 8 9 10 11 | { "keyframes": [ { // keyframe 0 }, { // keyframe 1 }, ], // non-keyframe bullet properties" } |
path would be MyCampaign/bullet/myBullet.
Included with pattern
This is the entire content of an example pattern file, lets say MyCampaign/pattern/myPattern.json.
1 2 3 4 5 6 7 8 9 10 11 12 13 14 15 16 17 18 19 20 21 22 23 | { "1": { "bullets": [".bullet"], // other pattern properties }, "2": { "bullets": [".bullet"], // other pattern properties }, "bullet": { "keyframes": [ { // keyframe 0 }, { // keyframe 1 }, ], // non-keyframe bullet properties" }, } |
path would be MyCampaign/pattern/myPattern.bullet. As you can see above, when referencing it from within the same json object, you can just use .bullet.
The path of the patterns would be myCampaign/pattern/myPattern.1 and myCampaign/pattern/myPattern.2, when spawning them with Actions.
Bullet Properties
Most properties of a bullet are set as part of a keyframe, to simplify changing the state of a bullet between specific configurations.
However some important properties are set for the bullet as a whole, instead of being set per-keyframe.
These are some of the most important non-keyframe properties for a bullet.
| Property | Summary |
|---|---|
shapeType |
the shape of the bullet (Circle, Diamond, or Rect) |
lifetime |
despawn after this many seconds |
startSpeed |
spawn with this velocity |
depthLevel |
the layer to draw the bullet on (DepthLevel →) |
Keyframes
Bullets have one or more keyframes, containing properties you can change over time.
Diamond pattern example
1 2 3 4 5 6 7 8 9 10 11 12 13 14 15 16 17 18 19 20 21 22 23 24 25 26 27 28 29 30 31 32 33 34 35 36 37 38 39 40 41 42 43 44 45 46 47 48 49 50 51 52 53 | { "1": { "numVolleys": 50, "numBulletsInVolley":2, "shootDelay": "volleyNum % 10 == 0 ? 0.33f : 0.05f", // this ternary operation sets shootDelay to 0.33s when the modulus operator (the % that returns the remainder) returns zero, or 0.05s otherwise "bullets": [".bullet"], "sfxVolley": "ShootSoftWomp", "rotationSpeed":-100, }, "bullet": { "keyframes": [ { // KEYFRAME 0 "duration":0.5, "acceleration":66, "frictionPercent":0.05, "sprite":"sprites/diamond/simple", "colorA1":{ "value": {"r":1,"g":0,"b":0,"a":0.6}}, "colorA2":{ "value": {"r":1,"g":0.1,"b":0,"a":0.7}}, "colorB1":{ "value": {"r":0.8,"g":0,"b":0,"a":0.6}}, "colorB2":{ "value": {"r":0.6,"g":0,"b":0,"a":0.7}}, "colorC1":{ "value": {"r":1,"g":0.1,"b":0.2,"a":0.4}}, "colorC2":{ "value": {"r":0.8,"g":0.2,"b":0.3,"a":0.5}}, "glowA": 0, "glowB": 0.5, "glowC": 2, "colorBlinkTime":0.15, "opacity":0, "easingType":"QuadOut", }, { // KEYFRAME 1 "duration":1, "opacity":1, "length":8, "crossWidth":2, "crossDistance":0.3, "easingType":"QuadIn", }, { // KEYFRAME 2 "duration":0, "crossWidth":12, "crossDistance":0.7, }, ], "startSpeed":33, "lifetime":30, "depthLevel": "Bullet", "shapeType": "Diamond", }, } |
This bullet spends 0.5 seconds in its first keyframe, eases the values to the 2nd keyframe with the easing type QuadOut (quickly approach target value, then slow down as you reach it), then spends 1 second easing in to the 3rd keyframe with an easing type of QuadIn (slowly begin changing to target value, then quickly reach it).
You can see that the width of the bullet quickly reaches the value in keyframe 1 (the second keyframe), before slowly easing into the large width in keyframe 2. Since keyframe 2 does not specify a new length, opacity, etc, the bullet continues to use the previously set value.
Shape
Circle
| Keyframe Property | Summary |
|---|---|
radius |
the size of the circle bullet from center to edge |
| Non-Keyframe Property | Summary |
|---|---|
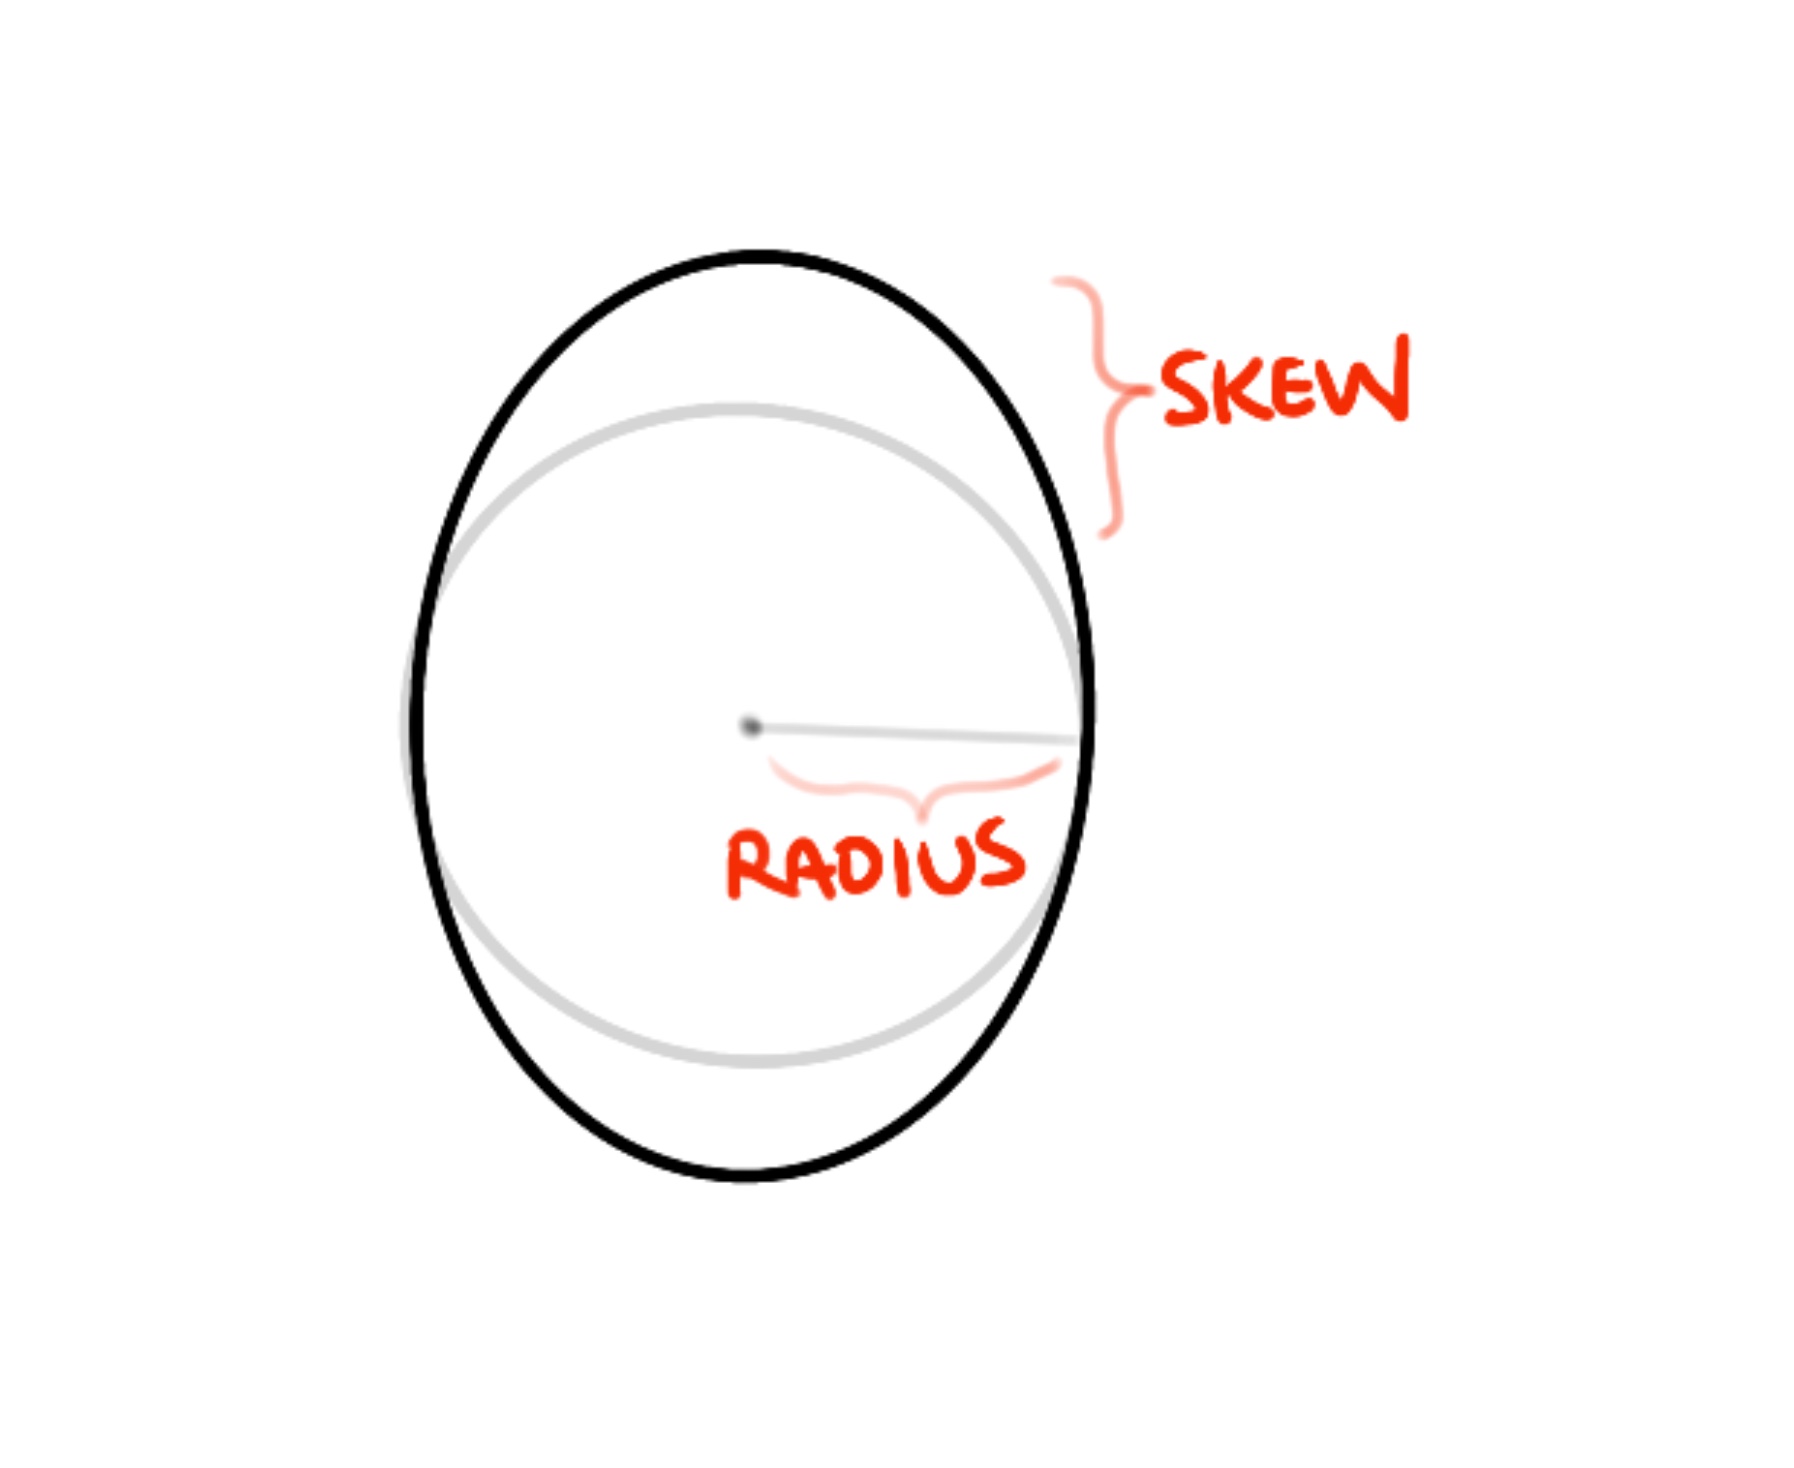
circleSkew |
the amount the circle bullet should stretch forward when moving fast (purely visual, doesn't affect the hitbox) |
circleSkewDist |
the distance required per frame to skew the max amount specified in circleSkew |
circleSkewEasingType |
how quickly to ease from no skew to full skew |
1 2 3 4 5 6 7 8 9 10 11 12 13 14 15 16 17 | "circleBullet": { "keyframes": [ { // ... "radius":2, // default is 0 }, { // ... "radius":4, }, ], // ... "shapeType": "Circle", "circleSkew":0.2, // default is 0 "circleSkewDist":1, // default is 0 "circleSkewEasingType":"QuadIn", // default is Linear }, |
Diamond
| Keyframe Property | Summary |
|---|---|
length |
length of diamond bullet |
crossWidth |
width of bullet at the widest point |
crossDistance |
how far forward the center of the diamond is (0-1) |
1 2 3 4 5 6 7 8 9 10 11 12 13 14 15 16 17 18 | "diamondBullet": { "keyframes": [ { // ... "length":2, // default is 0 "crossWidth":1, // default is 0 "crossDistance":0.33, // default is 0.5 }, { // ... "length":4, "crossWidth":1.5, "crossDistance":0.66, }, ], // ... "shapeType": "Diamond", }, |

Rect
| Keyframe Property | Summary |
|---|---|
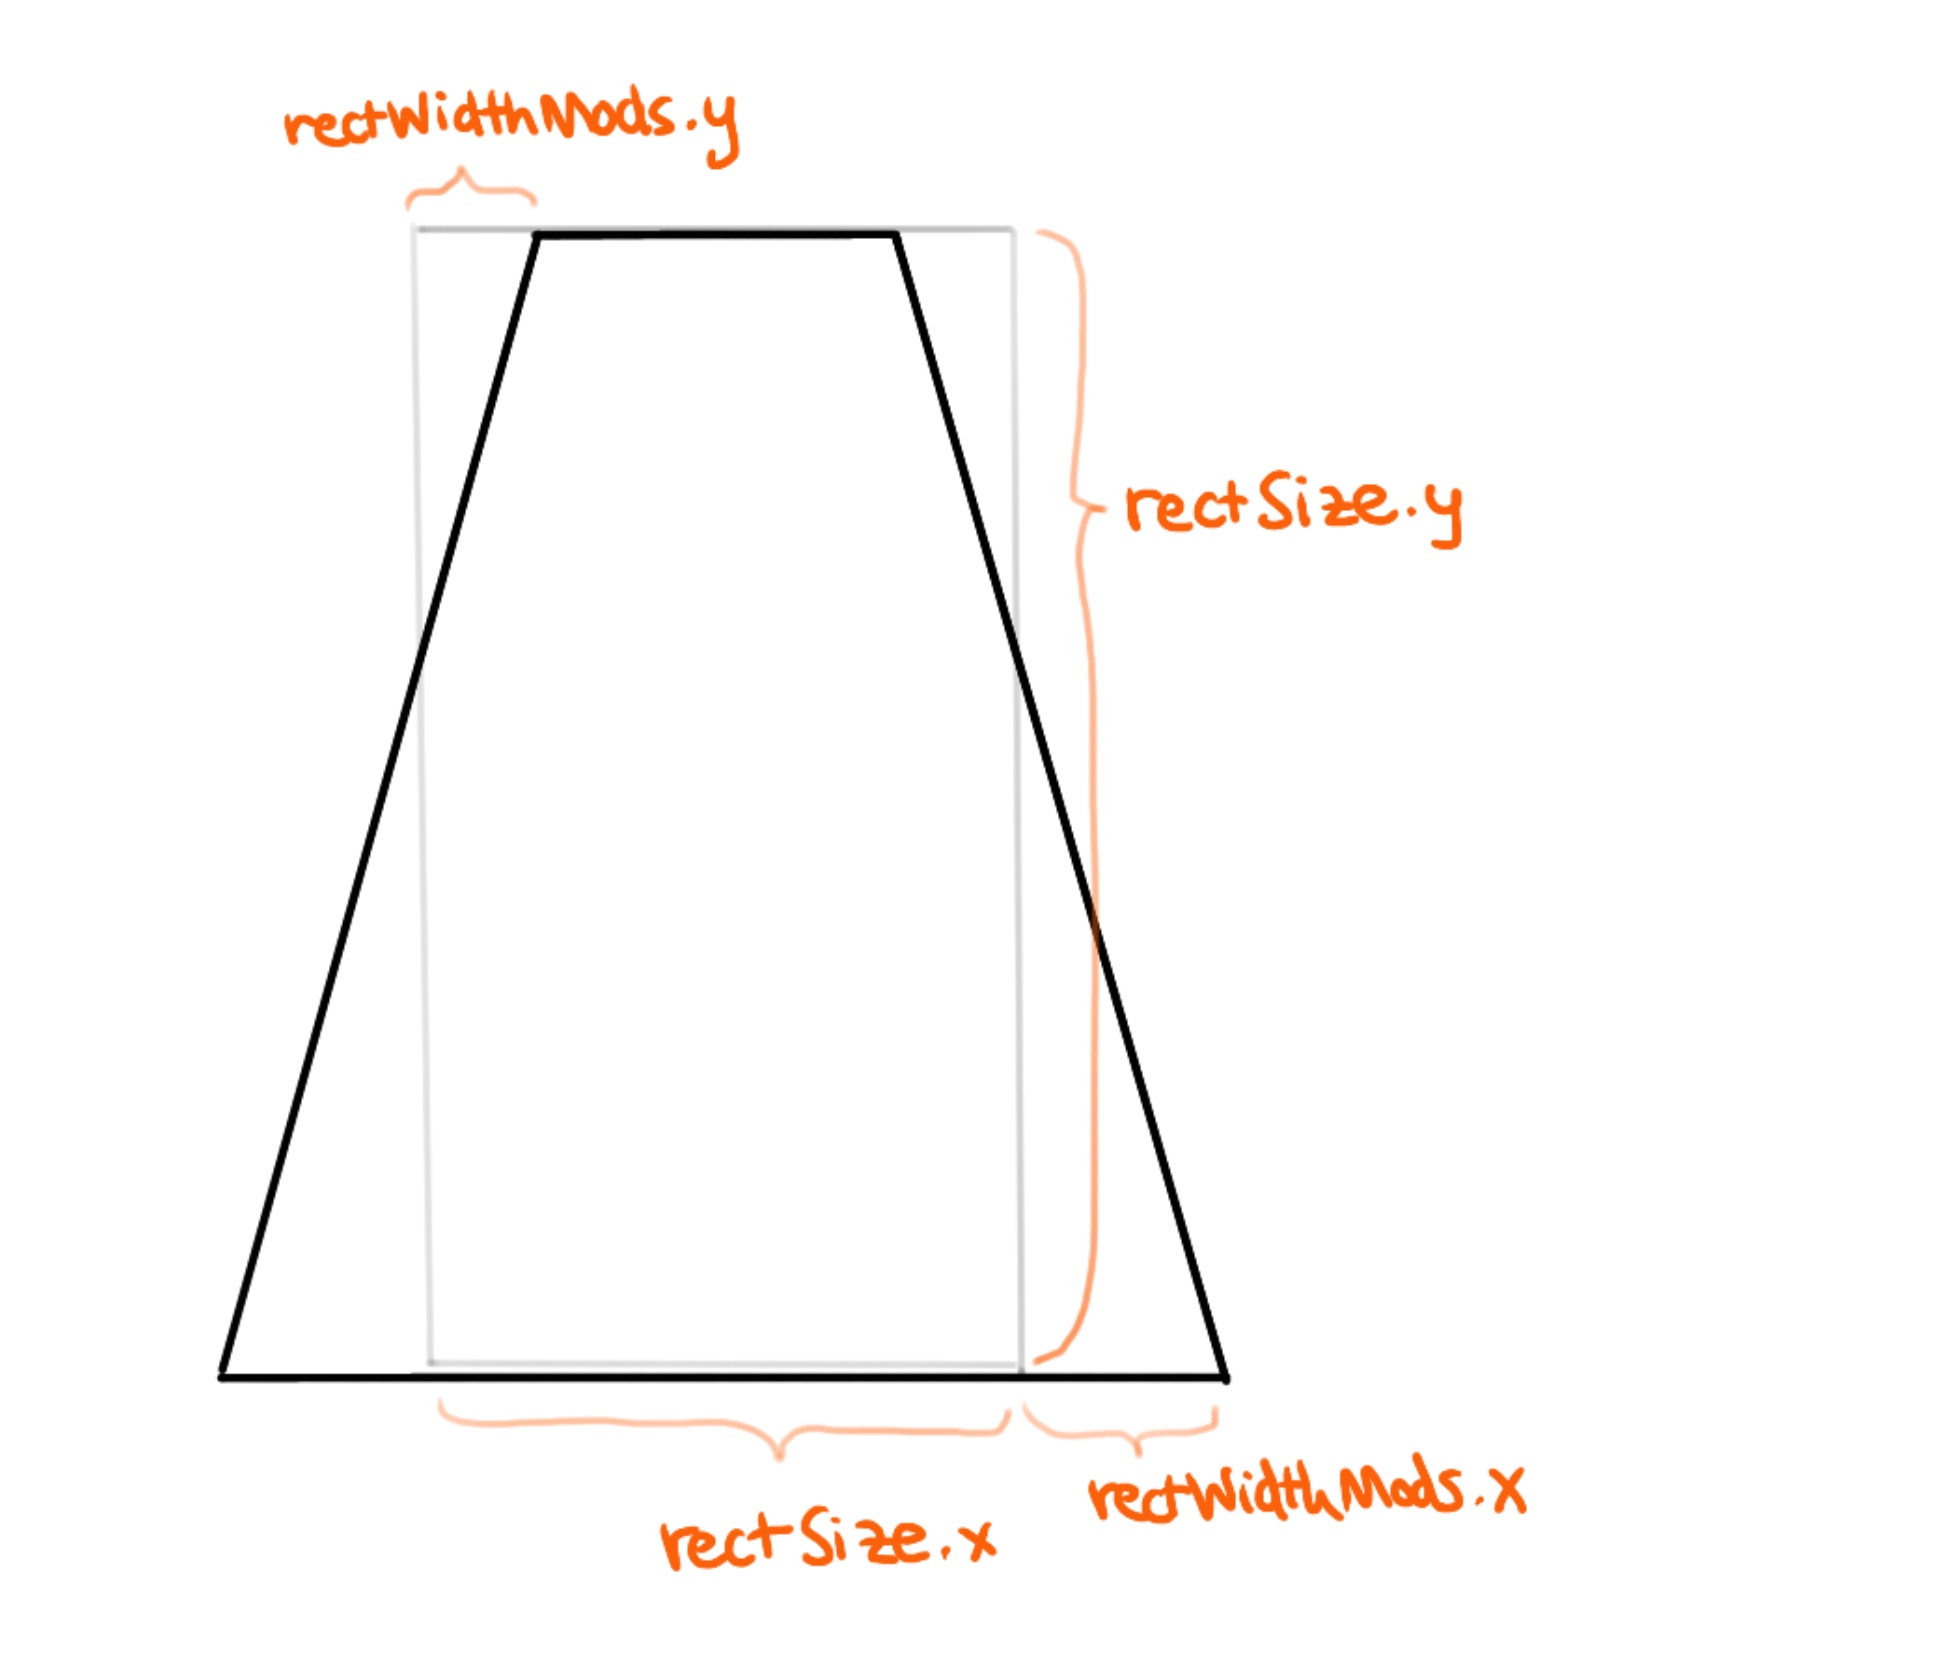
rectSize |
the width and length of the rectangle: vec2(width, length) |
rectWidthMods |
scaling applied to widths: vec2(back width scale, front width scale) |
1 2 3 4 5 6 7 8 9 10 11 12 13 14 15 16 | "rectBullet": { "keyframes": [ { // ... "rectSize":"vec2(4f, 2f)", // default is vec2(1f, 1f) "rectWidthMods":"vec2(0.5f, 1f)", // default is vec2(1f, 1f) }, { // ... "rectSize":"vec2(2f, 4f)", "rectWidthMods":"vec2(1f, 0f)", }, ], // ... "shapeType": "Rect", }, |
Sprite
Bullets must specify a sprite in their first keyframe. If a different sprite is specified in the next kefyrame, the bullet will blend into it over the current keyframe's duration. All the sprites used by a bullet need to have the same dimensions.
1 2 3 4 5 6 7 8 9 10 | "keyframes": [ { // ... "sprite":"sprites/circle/simple", }, { // ... "sprite":"sprites/circle/triangle2", }, ] |
Color
Bullets don't reproduce their sprites exactly - instead they use color substitution to replace the red, blue, and green elements of the sprite with their own colors.

When using the above sprite, a bullet would choose what color they want to replace red with, green with, and blue with.
1 2 3 4 5 6 7 8 9 10 11 12 13 14 15 16 17 18 19 | "bullet": { "keyframes": [ { // ... "sprite":"sprites/circle/simple", "colorA1":{ "value": {"r":1,"g":0,"b":0,"a":0.9}}, "colorA2":{ "value": {"r":1,"g":0.2,"b":0,"a":0.7}}, "colorB1":{ "value": {"r":1,"g":0,"b":0.1,"a":0.8}}, "colorB2":{ "value": {"r":1,"g":0,"b":0.2,"a":0.6}}, "colorC1":{ "value": {"r":1,"g":0.3,"b":0,"a":0.2}}, "colorC2":{ "value": {"r":1,"g":0.4,"b":0,"a":0.1}}, "glowA": 4, "glowB": 0.5, "glowC": 0, "colorBlinkTime":0.15, }, // ... ], }, |
In the above example, colorA1 and colorA2 will be used to replace the red portion of the sprite. colorB1 and colorB2 will be used to replace green, and colorC1 and colorC2 will replace blue.
So instead of appearing with red/green/blue rings, the bullet would be drawn like this:
glowA is simply an additional factor that changes the strength of colorA1 and colorA2. Alternatively, the colors themselves could be declared like this for the same effect:
1 | "colorA1":"color(1f, 0f, 0f, 0.9f) * 4f", |
colorBlinkTime determines how rapidly the color pairs alternate - how quickly the red portion of the sprite blinks between colorA1 and colorA2, etc.
Movement
A bullet's starting velocity is set with the non-keyframe property startSpeed.
The keyframe property acceleration controls how fast they accelerate each frame.
The keyframe property frictionPercent is a value from 0-1 that controls how much of the bullet's speed is lost. A value of 0.1 means that the bullet will lose 10% of its velocity each frame.
Changing Direction
By default, bullets simply move forward in the direction their pattern spawns them in. Changing the keyframe property moveAngle will adjust the direction the bullet's acceleration moves them in.
The following bullet sets "moveAngle":-90 on its third keyframe, which causes the bullet to turn 90° to the right, relative to its starting angle.
The blue line shows the bullet's current move direction, and the red line shows the bullet's current facing direction.
Full json file
1 2 3 4 5 6 7 8 9 10 11 12 13 14 15 16 17 18 19 20 21 22 23 24 25 26 27 28 29 30 31 32 33 34 35 36 37 38 39 40 41 42 43 44 45 46 47 48 49 50 51 52 53 54 55 56 57 58 | { "1": { "numVolleys": 15, "numBulletsInVolley":3, "shootDelay": 0.5, "bullets": [".bullet"], "sfxVolley": "ShootSoftWomp", "rotationSpeed":-50, }, "bullet": { "keyframes": [ { "duration":0.5, "acceleration":5, "frictionPercent":0.25, "length":10, "crossWidth":4, "crossDistance":0.66, "sprite":"sprites/diamond/simple", "colorA1":{ "value": {"r":1,"g":0,"b":0,"a":0.9}}, "colorA2":{ "value": {"r":1,"g":0.2,"b":0,"a":0.7}}, "colorB1":{ "value": {"r":1,"g":0,"b":0.3,"a":0.8}}, "colorB2":{ "value": {"r":1,"g":0,"b":0.6,"a":0.6}}, "colorC1":{ "value": {"r":1,"g":0.3,"b":0.2,"a":0.5}}, "colorC2":{ "value": {"r":1,"g":0.4,"b":0.2,"a":0.4}}, "glowA": 2.5, "glowB": 0.5, "glowC": 1, "colorBlinkTime":0.25, "opacity":0, "easingType":"QuadOut", "facingSpeedPercent":0.1, }, { "duration":1.5, "acceleration":66, "frictionPercent":0.05, "glowA": 3.5, "opacity":1, "easingType":"QuadIn", }, { "duration":2.5, "moveAngle":-90, }, ], "startSpeed":120, "lifetime":30, "depthLevel": "Bullet", "shapeType": "Diamond", "despawnTime":0.15, "onUpdate":[ { "action": "CallMethod", "target":"stage", "method": "DrawDebugLine", "params": { "a": "bulletPos", "b":"bulletPos + facingDir * 12f", "color":"color(1f, 0f, 0f) * 2f"}}, { "action": "CallMethod", "target":"stage", "method": "DrawDebugLine", "params": { "a": "bulletPos", "b":"bulletPos + angleToVec(moveAngle) * 7f", "color":"color(0.1f, 0.1f, 1f) * 3f"}}, ], }, } |
Absolute Angles
If you want a bullet to interpret "moveAngle":-90 as an absolute instead of relative angle, you can set the non-keyframe property useAbsoluteAngles to true.
1 2 3 4 5 6 7 8 9 10 11 | { "keyframes": [ // ... { // ... "moveAngle":-90, }, ], // ... "useAbsoluteAngles":true, } |
Now, the same bullets as before are all moving to the right on their third keyframe, instead of moving 90° to the right of their current angle.
In other words, bullets normally factor in their starting angle, so that bullet patterns will be 'symmetrical'.
Generally, homing/following bullets will want to set useAbsoluteAngles to true.
For the record, this is the way angles are set up in Chippy:

Direct Movement
It's possible to control a bullet's position directly, instead of relying on the physics of acceleration/velocity/deceleration.
1 2 3 4 5 6 7 8 9 | "keyframes": [ // ... { //... "moveMode":"Target", "targetPos":"playerPos", "posLerpSpeed":0.01, }, ], |
When the bullet enters this keyframe, it will set its target position to the player's current location. From then on, its posLerpSpeed of 0.01 will move the bullet 1% of the remaining distance to the target per frame.
Facing
By default, bullets don't rotate at all. By specifying a value from 0-1 for the keyframe property facingSpeedPercent, the bullet will ease toward a certain direction - normally the same direction as their velocity.
1 2 3 4 5 6 | "keyframes": [ { // ... "facingSpeedPercent":0.1, }, ], |
For a bullet that rotates automatically instead of trying to face a certain direction, you can set the facingMode to AutoRotate, and setting the rotationSpeed.
1 2 3 4 5 6 7 | "keyframes": [ { // ... "facingMode":"AutoRotate", "rotationSpeed":"rand.Float(-100f, -500f)", }, ], |
There are several other values for facingMode:
| facingMode | Summary |
|---|---|
Velocity |
face toward velocity direction using facingSpeedPercent |
MoveAngle |
face toward current moveAngle using facingSpeedPercent |
Position |
face toward position delta using facingSpeedPercent |
Target |
face toward targetFacingAngle using facingSpeedPercent |
AutoRotate |
rotate using rotationSpeed |
Looping
Sometimes it's useful for a bullet to repeat keyframes multiple times. By setting the non-keyframe property shouldLoop to true, a bullet will continue looping through each keyframe unless told otherwise.
Looping bullet definition
1 2 3 4 5 6 7 8 9 10 11 12 13 14 15 16 17 18 19 20 21 22 23 24 25 26 27 28 29 30 31 32 33 34 35 36 37 38 39 40 41 42 43 44 45 46 47 48 49 50 51 52 53 54 55 56 57 58 | "bullet": { "keyframes": [ { // KEYFRAME 0 "duration":0.5, "acceleration":5, "frictionPercent":0.25, "crossDistance":0.66, "sprite":"sprites/diamond/simple", "glowA": 2.5, "glowB": 0.5, "glowC": 1, "colorBlinkTime":0.25, "opacity":0, "easingType":"QuadOut", "facingSpeedPercent":0.1, "loopEnd":1, // this keyframe ignored on loop number 1 or higher (the first loop is #0) }, { // KEYFRAME 1 "duration":1, "acceleration":150, "frictionPercent":0.15, "colorA1":{ "value": {"r":1,"g":0,"b":0.2,"a":0.9}}, "colorA2":{ "value": {"r":1,"g":0.05,"b":0.1,"a":0.7}}, "colorB1":{ "value": {"r":1,"g":0,"b":0.3,"a":0.8}}, "colorB2":{ "value": {"r":1,"g":0,"b":0.6,"a":0.6}}, "colorC1":{ "value": {"r":1,"g":0.1,"b":0.2,"a":0.5}}, "colorC2":{ "value": {"r":1,"g":0.25,"b":0.2,"a":0.4}}, "glowA": 5, "opacity":1, "easingType":"Linear", "moveAngle":45, "length":10, "crossWidth":4, }, { // KEYFRAME 2 "duration":1, "colorA1":{ "value": {"r":0.5,"g":0.3,"b":0,"a":0.9}}, "colorA2":{ "value": {"r":0.5,"g":0.2,"b":0,"a":0.7}}, "colorB1":{ "value": {"r":0.5,"g":0.6,"b":0.3,"a":0.8}}, "colorB2":{ "value": {"r":0.5,"g":0.5,"b":0.6,"a":0.6}}, "colorC1":{ "value": {"r":0.5,"g":0.6,"b":0.2,"a":0.5}}, "colorC2":{ "value": {"r":0.5,"g":0.8,"b":0.2,"a":0.4}}, "glowA": 3, "moveAngle":-45, "length":8, "crossWidth":5, }, ], "startSpeed":120, "lifetime":30, "shouldLoop":true, // enable keyframe looping "depthLevel": "Bullet", "shapeType": "Diamond", "despawnTime":0.15, }, |
This bullet loops its second and third keyframe, but only plays its first keyframe once, thanks to "loopEnd":1. This means that the first keyframe (Keyframe 0) will be skipped when the number of times we've looped over this bullet's keyframes is >= 1, so it will be skipped the second time through.
The sequence of keyframes this bullet will follow is 0, 1, 2, 1, 2, 1, 2...
The bullet wobbles back and forth, since its moveAngle constantly changes from -45 to 45.
Its color and size changes too.
Some other properties that keyframes can use to change how bullet state flows:
| Property | Summary |
|---|---|
loopStart |
Keyframe will be ignored until we are on loop number N or greater |
loopEnd |
Keyframe will be ignored if we are on or past loop number N (non-inclusive) |
loopModulus |
Keyframe active every N loops |
chance |
Chance of using keyframe (from 0 to 1) |
next |
Go to that frame number instead of the next one |
Script Functions
Up until now, most of the bullet properties we've seen have been used like this, with simple numbers:
1 | "acceleration":150, |
Instead these values can be expressed as string "script functions" that will be baked into C# code later.
1 | "acceleration":"map(volleyNum, 0, 99, 150f, 400f)", |
Each bullet knows which volley it was fired in, by its parent pattern, and that value can be accessed with volleyNum.
The map function is used to map a number from one range to another.
In this case, the bullet's acceleration will be 150 if it was part of the pattern's first volley (#0), and will be 400 on the pattern's 100th+ volley.
The end result is that later bullets move faster:
Full json file
1 2 3 4 5 6 7 8 9 10 11 12 13 14 15 16 17 18 19 20 21 22 23 24 25 26 27 28 29 30 31 32 33 34 35 36 37 38 39 40 41 42 43 44 45 46 47 48 49 50 51 52 | { "1": { "numVolleys": 100, "numBulletsInVolley":3, "shootDelay": "volleyNum % 8 == 0 ? 0.1f : 0.05f", "bullets": [".bullet"], "sfxVolley": "ShootSoftWomp", "rotationSpeed":-50, }, "bullet": { "keyframes": [ { "duration":0.5, "acceleration":5, "frictionPercent":0.25, "crossDistance":0.66, "sprite":"sprites/diamond/simple", "glowA": 2.5, "glowB": 0.5, "glowC": 1, "colorBlinkTime":0.25, "opacity":0, "easingType":"QuadOut", "facingSpeedPercent":0.1, "loopEnd":1, }, { "duration":1, "acceleration":"map(volleyNum, 0, 100, 100f, 1000f)", "frictionPercent":0.15, "colorA1":{ "value": {"r":1,"g":0,"b":0.2,"a":0.9}}, "colorA2":{ "value": {"r":1,"g":0.05,"b":0.1,"a":0.7}}, "colorB1":{ "value": {"r":1,"g":0,"b":0.3,"a":0.8}}, "colorB2":{ "value": {"r":1,"g":0,"b":0.6,"a":0.6}}, "colorC1":{ "value": {"r":1,"g":0.1,"b":0.2,"a":0.5}}, "colorC2":{ "value": {"r":1,"g":0.25,"b":0.2,"a":0.4}}, "glowA": 5, "opacity":1, "easingType":"Linear", "moveAngle":45, "length":7, "crossWidth":2, }, ], "startSpeed":120, "lifetime":30, "depthLevel": "Bullet", "shapeType": "Diamond", "despawnTime":0.15, }, } |
PerUpdate Functions
Normally, script functions determine their values once, like a snapshot.
If you want a keyframe property to be continually updated every frame, you can use a "PerUpdate" function.
1 | "radius": { "mode": "PerUpdate", "value": "4f + fastSin(bulletTime * 8f) * 0.5f" }, |
radius, causing it to oscillate between 3.5 and 4.5.bulletTime returns the amount of time since the bullet spawned.fastSin is like sin, but faster and less accurate.
Full json file
1 2 3 4 5 6 7 8 9 10 11 12 13 14 15 16 17 18 19 20 21 22 23 24 25 26 27 28 29 30 31 32 33 34 35 36 37 38 39 40 41 42 43 44 45 46 47 | { "1": { "numVolleys": 40, "numBulletsInVolley":3, "shootDelay": "volleyNum % 8 == 0 ? 0.3f : 0.15f", "bullets": [".bullet"], "sfxVolley": "ShootSoftWomp", "rotationSpeed":-50, }, "bullet": { "keyframes": [ { "duration":1, "acceleration":5, "frictionPercent":0.25, "crossDistance":0.66, "sprite":"sprites/circle/simple", "glowA": 0, "glowB": 0.5, "glowC": 0.5, "colorBlinkTime":0.5, "opacity":0, "easingType":"QuadOut", "facingSpeedPercent":0.1, "radius": { "mode": "PerUpdate", "value": "4f + fastSin(bulletTime * 8f) * 0.5f" }, }, { "duration":0, "acceleration":66, "frictionPercent":0.1, "colorA1":{ "value": {"r":1,"g":0,"b":0.2,"a":0.9}}, "colorA2":{ "value": {"r":1,"g":0.05,"b":0.1,"a":0.7}}, "colorB1":{ "value": {"r":1,"g":0,"b":0.3,"a":0.8}}, "colorB2":{ "value": {"r":1,"g":0,"b":0.6,"a":0.6}}, "colorC1":{ "value": {"r":1,"g":0.1,"b":0.2,"a":0.5}}, "colorC2":{ "value": {"r":1,"g":0.25,"b":0.2,"a":0.4}}, "opacity":1, }, ], "startSpeed":200, "lifetime":30, "depthLevel": "Bullet", "shapeType": "Circle", "despawnTime":0.15, }, } |
Pixel Collision
If you want a certain bullet to collide with pixels, you must set the non-keyframe property collideWithPixels to true.
Generally you'll also want to set a value for the non-keyframe properties totalPixelDamage for the amount of damage the bullet has available, and impactPattern for the path of a visual effect bullet pattern that will emit when the bullet runs out of damage.
1 2 3 4 5 6 7 8 9 10 11 12 13 14 15 16 17 18 19 20 21 22 23 24 | { "pattern": { // ... "bullets": [".bullet"], "hitSelfPixels":true, // by default, bullets fired by enemies dont collide with their own pixels }, "bullet": { "keyframes":[ { "ignorePixelCollision":true, // don't collide with pixels for now }, // ... { "moveAngle":180, // move backwards "ignorePixelCollision":false, // re-enable pixel collision }, ], "collideWithPixels":true, // bullet is eligible for pixel collision "totalPixelDamage":50, "impactPattern":"misc/pattern/effect/defaultBulletImpact", "despawnStyle":"ShrinkToFront", // shrink forward when despawning }, } |
Full json file
1 2 3 4 5 6 7 8 9 10 11 12 13 14 15 16 17 18 19 20 21 22 23 24 25 26 27 28 29 30 31 32 33 34 35 36 37 38 39 40 41 42 43 44 45 46 47 48 49 50 51 52 53 54 55 56 57 58 59 60 61 62 63 64 65 66 67 68 69 70 71 72 73 74 75 | { "1": { "numVolleys": 40, "numBulletsInVolley":3, "shootDelay": "volleyNum % 8 == 0 ? 0.3f : 0.15f", "bullets": [".bullet"], "sfxVolley": "ShootSoftWomp", "rotationSpeed":-50, "hitSelfPixels":true, }, "bullet": { "keyframes": [ { "duration":1, "acceleration":5, "frictionPercent":0.25, "sprite":"sprites/diamond/simple", "glowA": 3, "glowB": 1.5, "glowC": 1.5, "colorBlinkTime":0.5, "opacity":0, "easingType":"QuadOut", "facingSpeedPercent":0.1, "length":7, "crossWidth":3, "crossDistance":0.33, "ignorePixelCollision":true, }, { "duration":2, "acceleration":120, "frictionPercent":0.1, "colorA1":{ "value": {"r":1,"g":0,"b":0.2,"a":0.9}}, "colorA2":{ "value": {"r":1,"g":0.05,"b":0.1,"a":0.7}}, "colorB1":{ "value": {"r":1,"g":0,"b":0.3,"a":0.8}}, "colorB2":{ "value": {"r":1,"g":0,"b":0.6,"a":0.6}}, "colorC1":{ "value": {"r":1,"g":0.1,"b":0.2,"a":0.5}}, "colorC2":{ "value": {"r":1,"g":0.25,"b":0.2,"a":0.4}}, "opacity":1, "glowA": 0, "glowB": 0.5, "glowC": 0.5, }, { "duration":0.25, }, { "moveAngle":180, "acceleration":200, "length":5, "crossWidth":1.5, "crossDistance":0.66, "ignorePixelCollision":false, "colorA1":{ "value": {"r":1,"g":0,"b":0,"a":0.9}}, "colorA2":{ "value": {"r":1,"g":0.05,"b":0,"a":0.7}}, "colorB1":{ "value": {"r":1,"g":0,"b":0,"a":0.8}}, "colorB2":{ "value": {"r":1,"g":0,"b":0,"a":0.6}}, "colorC1":{ "value": {"r":1,"g":0.1,"b":0,"a":0.5}}, "colorC2":{ "value": {"r":1,"g":0.25,"b":0,"a":0.4}}, "colorBlinkTime":0.1, }, ], "startSpeed":200, "lifetime":30, "depthLevel": "Bullet", "shapeType": "Diamond", "despawnTime":0.15, "collideWithPixels":true, "totalPixelDamage":50, "impactPattern":"misc/pattern/effect/defaultBulletImpact", "despawnStyle":"ShrinkToFront", }, } |
Player Collision
By default, bullets deal deal damage to the player on collision, either removing a shield or killing them. The bullet is destroyed by the impact unless specified otherwise.
To change what happens on player collision, define the onHitPlayer handler:
1 2 3 4 5 6 7 8 9 | "bullet": { // ... "onHitPlayer":[ { "action": "CallMethod", "target": "stage", "method": "ShakeCamera", "params": { "strength": 5, "time": 0.3, "easingType": "QuadOut" }}, // without calling this, bullet will despawn without hurting player { "action": "CallMethod", "method": "DamagePlayer", }, ], }, |
Once onHitPlayer is defined, the bullet no longer automatically damages the player.
If you don't want the bullet to despawn when it collides with the player, set despawnOnPlayerHit to false.
1 2 3 4 | "bullet":{ // ... "despawnOnPlayerHit":false, }, |
To ignore collision with the player altogether, there are a couple options: ignorePlayerCollision is both a keyframe property and a non-keyframe property.
Set the non-keyframe property to true if you never want the bullet to collide with the player.
Set the keyframe property to true if you temporarily want to disable player collision.
1 2 3 4 5 6 7 8 9 10 11 12 13 14 15 16 17 18 19 20 21 22 23 24 25 | { "bullet0": { "keyframes":[ /* ... */ ], // this bullet will NEVER be considered for player collision "ignorePlayerCollision":true, }, "bullet1": { "keyframes":[ { "duration":1, // ignore player collision until told otherwise "ignorePlayerCollision":true, }, { "duration":0, // player collision is now re-enabled "ignorePlayerCollision":false, }, ], }, } |
Child Patterns
Bullets that spawn other bullets can create very interesting attacks. Bullets can either call the stage's SpawnPattern method to simply create a pattern, or they can call their own AddPattern method to drag a pattern along with it.
1 2 3 4 5 6 7 | { // child pattern automatically created at bullet's location, and anchored to it { "action": "CallMethod", "method": "AddPattern", "params": { "path": ".childPattern", }}, // child pattern created on its own, no connection to parent bullet { "action": "CallMethod", "target":"stage", "method": "SpawnPattern", "params": { "path": ".childPattern", "pos":"bulletPos" }}, }, |
In the following clip, the bullet on the left anchors its child pattern by calling the AddPattern method of Bullet, while the bullet on the right does not anchor its child pattern when it calls the SpawnPattern method of Stage.
A pattern can set the despawnWhenAnchorInactive property to true if you want it to stop when the bullet that is dragging it along is removed.
Setting a pattern's rotateWithAnchor property to true will cause it to rotate as the bullet its anchored to rotates.
Visual Effect Bullets
Bullets are used for most of the particle effects in Chippy (the main exception being the pixel debris, which is a Unity particle system).
When you want to use a bullet for purely visual reasons with no effect on gameplay, set the isStrictlyVisual property to true.
1 2 3 4 | "bullet": { // ... "isStrictlyVisual":true, }, |
Now that bullet won't be considered for collision with pixels or the player and won't be affected or destroyed by any Actions.
Handlers
You may want to call Actions at certain points during a bullet's lifetime.
1 2 3 4 5 6 7 8 9 10 11 12 13 14 15 16 17 18 19 20 21 22 23 24 | "bullet": { "keyframes": [ // ... ], // ... "onStart":[ // called when the bullet spawns { "action": "CallMethod", "target":"stage", "method": "ShakeCamera", "params": { "strength": 3, "time": 0.5, "easingType": "QuadOut" }}, ], "onHitPlayer":[ // called when the bullet hits a player // (if onHitPlayer is declared, the bullet won't automatically damage the player like it normally does) ], "onUpdate":[ /* called each frame the bullet is active */ ], "onHitPixel":[ /* called when the bullet hits a pixel and fails to destroy it */ ], "onDestroyPixel":[ /* called when the bullet destroys a pixel and still has damage remaining */ ], "onHitPart":[ /* called when the bullet hits a part */ ], "onHitPartProtected":[ /* called when the bullet hits a part that is shielded by another part */ ], "onLifetimeFinished":[ /* called when the bullet's lifetime elapses */ ], "onRemove":[ /* called when the bullet finishes despawning */ ], "onOutOfBounds":[ /* called when the bullet leaves the arena bounds */ ], }, |
Some of the handlers have useful properties available to them when they call their actions.
onHitPixel, onDestroyPixel, onHitPart, and onHitPartProtected have the following properties:
| Property | Summary |
|---|---|
hitPos |
the position of the collision |
hitNormal |
the normal of the collision (the direction the hit pixel's edge was facing) |
hitPixel |
the PixelData of the hit pixel |
hitPart |
the PixelGroup of the hit pixel (only for onHitPart and onHitPartProtected) |
hitUnit |
the Unit that owns the hit pixel |
onOutOfBounds has the following properties:
| Property | Summary |
|---|---|
outOfBoundsPos |
the position where the bullet left bounds |
outOfBoundsNormal |
the normal of the arena edge the bullet passed (eg, vec2(-1f, 0f) for the right edge) |
Floating Text
Floating text (used in Chippy for damage amount floaters and powerup alerts) can only be created when added to a bullet.
To control the text's movement, you simply use the existing bullet properties.
When the bullet despawns, the text is removed.
1 2 3 4 5 6 7 | "onKeyframe":[ { "action": "CallMethod", "method": "AddText", "params": { "message": "${playerPos}", "opacity":0.75, } }, ], |
Remember, the bullet itself does not have to be visible!
Example bullet json
1 2 3 4 5 6 7 8 9 10 11 12 13 14 15 16 17 18 19 20 21 22 23 24 25 26 27 28 29 30 31 32 33 34 35 36 37 38 39 40 41 42 43 44 45 46 47 48 49 50 51 52 53 54 55 56 57 58 59 60 61 62 63 64 | "bullet": { "keyframes": [ { "duration":0.75, "acceleration":0, "frictionPercent":0.05, "colorA1":{"r":1,"g":0.33,"b":0.33,"a":1}, "colorA2":{"r":1,"g":0.15,"b":0.15,"a":0.75}, "colorB1":{"r":1,"g":0,"b":0.1,"a":0.25}, "colorB2":{"r":1,"g":0,"b":0.1,"a":0.33}, "colorC1":{"r":1,"g":0.3,"b":0.3,"a":0.9}, "colorC2":{"r":1,"g":0.2,"b":0.1,"a":1}, "colorBlinkTime":0.075, "easingType":"QuadOut", "loopEnd": 1, "glowA": 8, "glowB": 8, "glowC": 8, "opacity":0, "radius":3.5, "sprite":"sprites/circle/simple", }, { "duration":1, "acceleration":8, "frictionPercent":0.033, "glowA": 1.75, "glowB": 1, "glowC": 1, "opacity":0.33, "onKeyframe":[ { "action": "CallMethod", "target":"this", "method": "AddText", "params": { "message": "TEST", "font": "MonoMMM", "material": "Outline", "scale":"vec2(0.8f, 2.5f)", "colorA":"color(1f, 0.9f, 0.5f)", "colorB":"color(1f, 0.5f, 0.5f)", "fontSize":3.5, "opacity":0.5, "lerpSpeed":0.075, } }, ], }, { "duration":1, "opacity":0, "onKeyframe":[ { "action": "CallMethod", "method": "SetTextSize", "params": { "size": 5,}}, ], }, ], "startSpeed":20, "lifetime":3, "shouldLoop":false, "despawnAfterKeyframes":false, "depthLevel": "BulletTop", "shapeType": "Circle", "impulseFrictionPercent":0.05, "despawnTime":0.33, "useAbsoluteAngles":true, "circleSkew":0.125, "circleSkewDist":0.5, }, |
All AddText parameters
| Property | Type | Summary |
|---|---|---|
message |
string | the text to show (use $ |
opacity |
string | how opaque text is |
scale |
Vector2 | width and height scaling for text (default = vec2(1f, 1f)) |
colorA |
Color | first color of text |
colorB |
Color | second color of text |
colorBlinkTime |
float | time to blink between first and second color |
font |
FloatingTextFont | font to use, from the available fonts |
fontSize |
float | default = 2.5f |
material |
string | use "Outline" to show outlines, omit otherwise |
outlineWidth |
float | width of outline |
outlineColor |
Color | outline color |
offset |
Vector2 | position offset from bullet |
alignment |
BulletTextAlignment | which side of text is anchored |
useAngle |
bool | if true, rotate text as bullet rotates |
lerpSpeed |
float | how quickly the bullet changes to new values (0-1) |
There are also a number of methods that bullets can call to change their anchored text:
1 2 3 4 5 6 7 8 9 10 11 12 13 14 15 16 17 18 19 | SetTextLerpSpeed(float lerpSpeed) SetTextSize(float size) SetTextScale(Vector2 scale) SetTextOpacity(float opacity) SetTextMessage(string message) SetTextColorA(Color color) SetTextColorB(Color color) SetTextColor(Color color) SetTextColorBlinkTime(float time) SetTextOutlineColor(Color color) SetTextOutlineWidth(float width) SetTextNumChars(int numChars) SetTextStartChars(int startChar) SetTextCharacterSpacing(float spacing) SetTextLineSpacing(float spacing) SetTextWordSpacing(float spacing) SetTextOffset(Vector2 offset) DespawnText(Vector2 scale, float time = 1f, EasingType easingType = EasingType.QuadOut) Vector2 GetTextSize() |
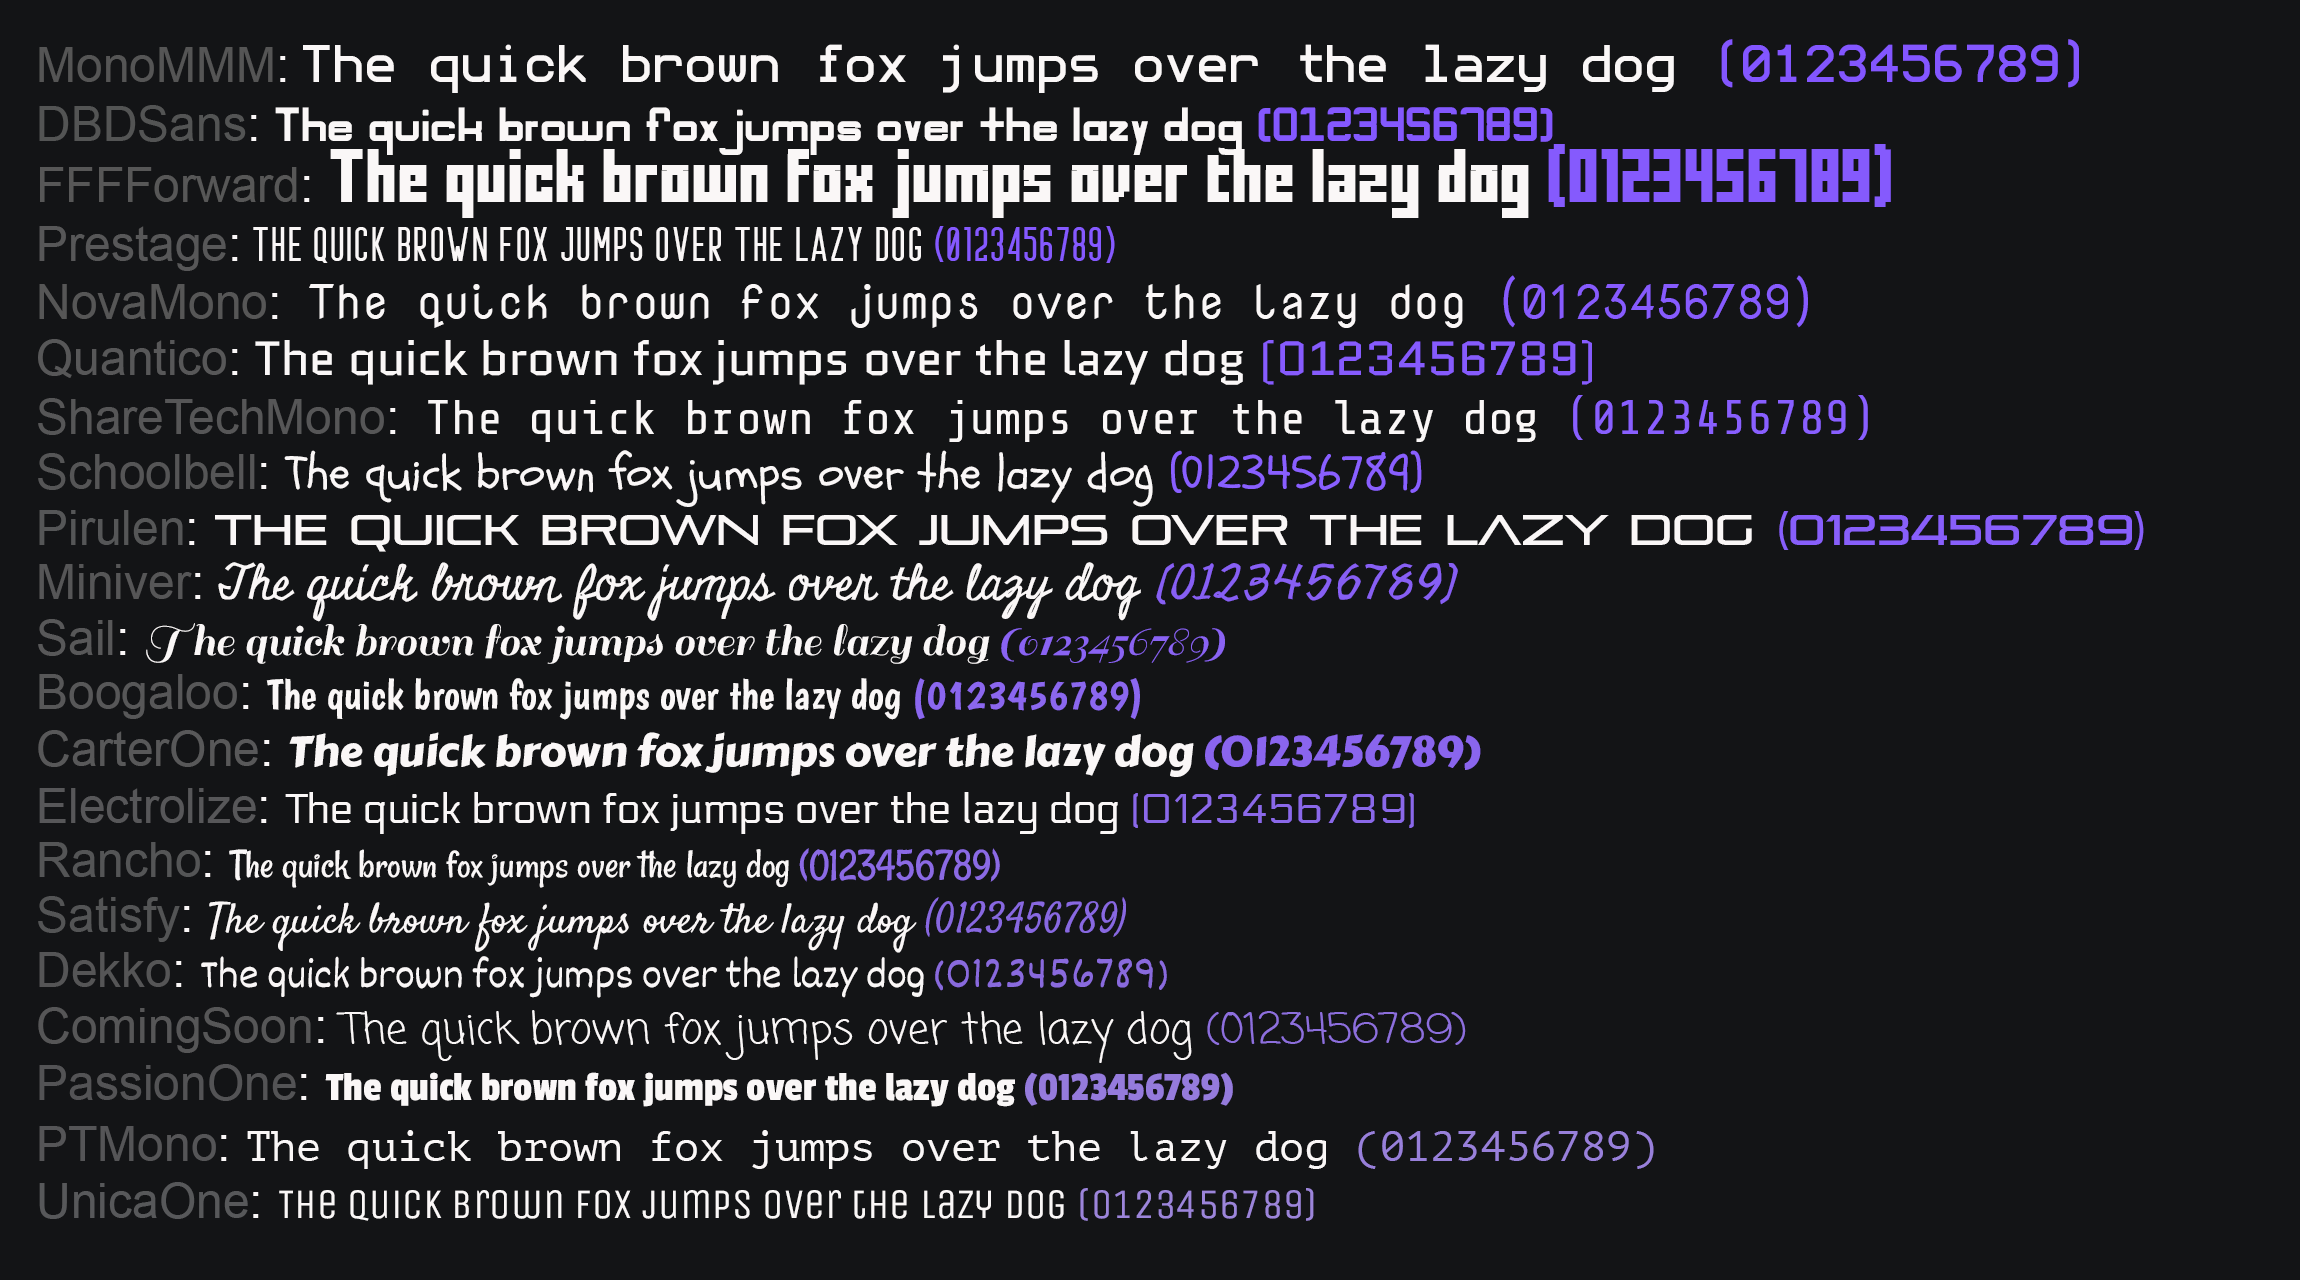
Fonts
Here is an image showing the different fonts available.
Bullet Variables
Bullets can't declare custom variables with properties the way that patterns, units, etc can.
However, each bullet has a few built-in variables that can be utilized.
intVar stores an integer value.
floatVar does a float value.
vectorVar stores a Vector2 value.
1 2 3 4 5 6 | "onUpdate":[ // examples of setting vars { "action": "CallMethod", "method": "SetFloatVar", "params": { "var":"easeOverTime(floatVar, 0f, 0.025f, dt)", }}, { "action": "CallMethod", "method": "SetIntVar", "params": { "var":"stage.StartLoopingSfx('SafeSpaceLoop', bulletPos, 1f)", }}, { "action": "CallMethod", "method": "SetVectorVar", "params": { "var":"vec2(bulletPos.y, playerPos.y)", }}, ], |
The variables can be used in any of the bullets scriptfuncs, such as:
1 | { "action": "CallMethod", "method": "SetPosition", "params": { "pos":"vectorVar", }}, |
Other Volley Bullets
Bullets can ask for information on other bullets fired in the same volley.
The following statement will get the position of the next bullet in the volley:
1 | "bullet.GetVolleyBullet(bulletNum + 1).Position"
|
Bullets can get a reference to themselves with the bullet property.
Script Parameters
These parameters can be used inside any scriptfunc in a Bullet.
Info
Debugging
debugVector: draws a 2d vector from the bullet's position
debugText: displays a string at the bullet's position (use ${NAME} for properties)